Review
- Stick-On Light (Halo Light) From Gametech
(Added
3rd March 2003)
Introduction
To-date, the best internal lighting solution available
for the GBA is the Afterburner.
Hands-down, the Afterburner beats nearly every other
external lighting solution currently available on the
market (e.g. Wormlight, Lightshield, etc.).
Unfortunately though, the Afterburner isn't easy
to install and requires that you disassemble your GBA
and know how to use a soldering iron. For the technically
challenged, installing the Afterburner can be quite
a nightmare and worst of all, unforgiving if you don't
follow the instructions to the latter.
Now, however, a new product has been released which
is not only easier to install than the Afterburner,
but also offers the same kind of internal front-light
solution. The product in question is the Stick-On Light
(or Halo Light) from Gametech. Just so you know, the
Stick-On Light is not an official Nintendo product and
using it on your GBA might void your warrantee. Now
that you've been warned, I'll get on with my review.
Out Of The Box And What
Do You Get
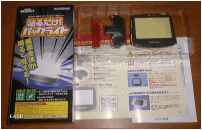
The Stick-On Light that we received was for the Japanese
market, so the packaging and all the manuals were in
Japanese. Everything was high quality though, and the
manual featured clear and concise color photos showing
you how to use and assemble the unit. As promised, it
was very easy to install. Basically, installation entails
that you remove the original screen cover from your
GBA and replace it with the Stick-On Light screen. There
is no need to do anything else to your GBA. Simple,
yes?
|
Click image
for bigger picture.
|
|
|
|
The full
box packaging with manual.
|
|
|
|
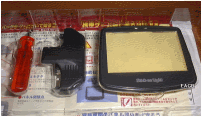
Main items
from left to right are: screen removing
tool, power unit, light screen.
|
How It Works And The Installation
First thing you should know before I proceed with
the installation is how the Stick-On Light actually
works. Well, the secret of the Stick-On Light is that
its screen already has the LED (light emitting diodes)
built into it. As such, it is somewhat thicker than
the original GBA screen and has two power points on
top. Once the light screen is stuck firmly on the GBA,
you then attach the T-shaped power unit which powers
the light screen. The power unit itself plugs into the
Ext. port on top of the GBA and draws its power from
the GBA's batteries.
|
Click image
for bigger picture.
|
|
|
|
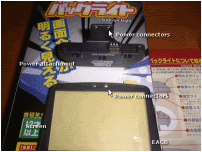
Screen
and power unit both have two power connectors.
|
|
|
|
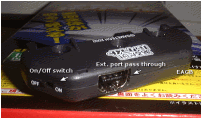
The power
unit has a pass through for other accessories
that need the Ext. port.
|
|

|
|
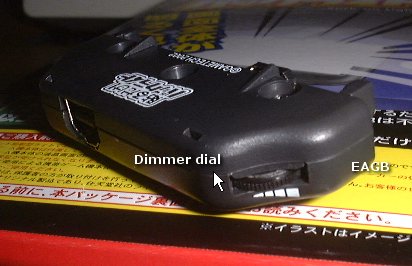
On/off
switch and dimmer dial is on the power unit
itself.
|
The installation of the Stick-On Light was a straight
forward affair. The first thing you have to do is to
prepare to remove your GBA's original screen. This is
done with the screen removing tool, which you'll use
to poke under the screen to pry it loose. This is easy
to do, and the trick is to do it slowly and carefully.
Once you've got the screen off, try to take the added
precaution of using a lens-blower to blow off any dust
on the GBA TFT screen. Then, simply attach the Stick-On
Light screen and voila!, you're done with the hard part.
Don't forget, however, to remove the protective adhesive
on both the front and back of the light screen before
sticking it on the GBA.
Once the light screen is on, you then attach the
power unit which plugs into the Ext. port on top of
the GBA. The power unit has an on/off switch as well
as a dimmer dial.
|
Click image
for bigger picture.
|
|
|
|
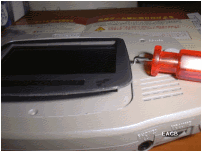
Use the
tool to pry the screen loose, then drag
it around the edges to cut through the adhesive.
|
|
|
|
Use a lens-blower
to get rid of dust particles on the TFT
screen.
|
|
|
|
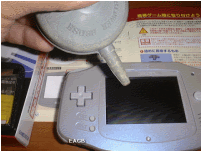
Stick on
the light screen but don't forget to remove
the protective adhesive film from the front
and back of the screen.
|
|
|
|
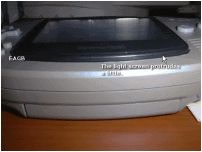
The light
screen is thicker because of the built-in
LED and will protrude a little.
|
|
|
|
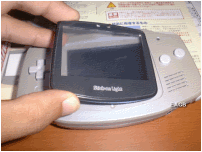
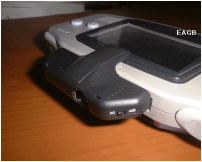
Attach
the power unit and turn on the light!
|
Using And Assessing
The ease of installation really got me excited about
trying the Stick-On Light. Almost immediately, I plugged
in a game, turned on my GBA and then turned on the screen
light and almost immediately, I was disappointed. First
of all, however, I went through everything again, just
to make sure I did it right, but seeing as how the installation
was so simple, there simply wasn't any way that I could
have botched it up.
As such, I am really sad to report that GBA Stick-On
light isn't what I expected it to be. See the picture
below, of the screen with the light on and taken in
total darkness. Click on it for a bigger image if you
want to.
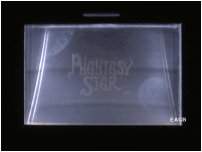
As you can see, the Stick-On Light not only has a
terrible problem with washed-out colors, it also has
a "trapezoid" effect that is a thousand times
worse than the Afterburner. Although the picture I took
was from a slightly elevated angle, the "trapezoid"
effect is still prevalent even when you view the screen
head on.
There was also a lot of glare from the internal light,
which made viewing the screen from any other angle but
head on almost impossible. I'm not really sure, but
it could be that the Stick-On Light does not use anti-reflective
film like the Afterburner, which results in light bouncing
off the GBA's TFT screen, thus causing the glare and
visual artifacts.
Worst of all, even with the light off, the replacement
screen made normal viewing terrible because of the thicker
border, which blocks off a few pixels from the top and
bottom of the screen. Also, the plastic used in the
screen must have been low grade, because somehow, it
made everything look somewhat distorted and blurry.
Conclusions
I'm not a technical person, so I can't really say
what's wrong with the Stick-On Light from a technical
point of view. I can say, however, that it doesn't work
very well and compared to the Afterburner, the Stick-On
Light is like a bad joke. Really, I can't understand
it and I'm really hoping that someone else will review
the Stick-On Light to prove me wrong. After all, I may
have been given a faulty unit.
In the meantime though, I'd suggest you give this
product a pass and settle for an Afterburner kit. Or,
if you can afford it, go buy a GBA SP on import and
save yourself the grief.
|