Review
- Ninja GBA Halo (Upgrade Version)
(Added
26th June 2003)
Introduction
I reviewed the first generation
GBA Halo Light some time ago and was appalled by its
dismal performance. Now, however, an "upgrade
version" has been released, and thanks to GoldenShop,
I have a sample here for review.

(*At this point, I wish
to thank GoldenShop for being kind enough to send me
another sample of their product, despite the fact that
I had lambasted the first. Unlike other import shops,
GoldenShop is unafraid of honest reviews, even when
it's bad. This speaks well for the team at GoldenShop,
and I thank them once again for sending us their
products for review.)
As far as I can tell, the only difference between
the original and upgraded version of the Halo Light
is that the upgraded version includes two additional
components: a piece of clear silicon rubber and a plastic
alignment
plate. Since the two products are basically the same,
I suggest you read my review of the first
generation Halo Light, as this review will
focus mainly on the new components in the upgraded
version, the extra steps needed to install them and
of course, the final outcome.
Out Of The Box And What
Do You Get
Click thumbnails for bigger
picture.
| 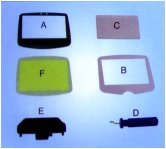
|
A: Halo Screen Cover
B: Silicon Rubber
Alignment Plate
C: Silicon Rubber
D:
Screen Removal Tool
E: Power Adapter
F:
Extra Double-Sided Screen Tape
You'll also get a well illustrated booklet
on how to set-up and use the Halo light.
|
How It Works And The Installation
Since the upgraded version of the Halo Light has
two new components, I will now explain how to install
them. The rest of the procedure is exactly the same
for the old Halo Light.
Click thumbnails for bigger
picture.
|
|
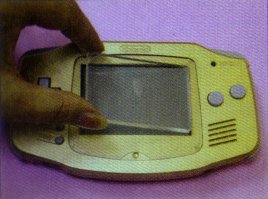
After you remove the original screen
cover, you'll need to place the alignment
plate (item B) on where the screen
used to be.
|
|
|
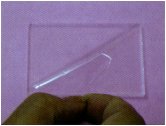
The silicon rubber (item C) piece
is protected on both sides by plastic film.
Carefully peel away only one side of
the film.
|
|
|
Using the alignment plate as a guide,
quickly place the silicon rubber (the side
without the protective film) directly onto
the GBA's LCD screen. It's important that
the LCD screen is clean and free from dust.
Using a lens blower would be a good
idea.
|
|
|
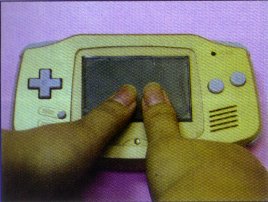
Now, starting from the center of the
silicon rubber, use your thumbs and press
out any air bubbles trapped between the
silicon rubber and the LCD screen.
|
|

|
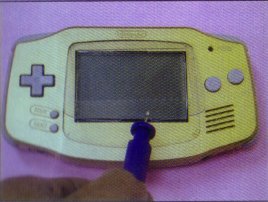
Once the silicon is firmly attached to
the screen and the air bubbles removed, use
the tool to remove the alignment plate.
|
|

|
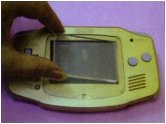
Remove the protection film from the silicon
rubber and then attach the Halo screen cover
(item A).
|
|

|
Just like before, press out any air
bubbles that is trapped between the
silicon rubber and the screen cover.
|
|
|
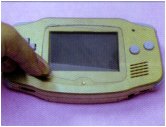
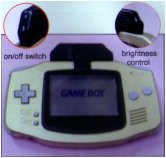
Finally, attach the Power Adapter (item
E), turn it on and adjust the brightness
control to your preference.
|
Using And Assessing
The upgraded version of the Halo Light entails a
few more steps to set up on the GBA. Still, it is relatively
easy and painless, compared to the set-up for the AfterBurner
Kit. In truth, the whole upgrade actually centers on
one main component, which is the silicon rubber piece.
The problem with the old Halo Light was that unlike
the AfterBurner, it did not include the AR film. The
main purpose of the AR film is to prevent glare and
diffuse the front-light evenly onto the GBA's LCD. Without
it, the old Halo light suffered terribly from glare,
color wash-out and uneven lighting.
To alleviate this problem, the upgraded Halo
light now includes a piece of silicon rubber to serve
as the AfterBurner's AR film. In theory, this seems
like
a good idea, but in real world testing, there are some
problems.
I should state first of all, that the inclusion of
the silicon rubber actually does improve the Halo light
tremendously. The problem of glare and uneven lighting
is greatly reduced. Unfortunately, the biggest problem
is that silicon rubber does not adhere firmly to the
LCD screen which results in rapid formation of air bubbles.
So, no matter how much you press out the air bubbles
initially, they will return in a matter of minutes and
spoil everything. In the Afterburner, the AR film is
"laminated" onto the LCD screen and so avoids
this problem.
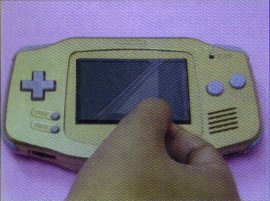
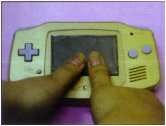
The picture below doesn't do justice to the actual
brightness and improved lighting of the new Halo
light. The trapezoid effect also isn't as pronounced
when viewed head-on although just like the AfterBurner,
you can expect some color wash-out. As I've mentioned,
the biggest problem is the air-bubbles, and in the picture
below, you can see that they are already starting to
form.
Conclusions
The Halo light was always meant as simpler alternative
to the AfterBurner, one that didn't require completely
taking apart your GBA and knowing how to use a soldering
iron. In it's first incarnation, it failed miserably
because it did not include a method to reduce glare
and provide even lighting.
In the upgraded version, it has actually found a
way to reduce these problem by using a piece of silicon
rubber which acts like the famed AfterBurner's
AR film. Unfortunately, although the silicon rubber
does work, it fails terribly in application, simply
because it can't adhere firmly to the LCD screen. Yes,
they should have used AR film in the first place, but
that would have made the Halo light complicated to
use. If you've tried the AfterBurner kit, you will know
that the process of "laminating" the AR film
onto the GBA's LCD is difficult, tedious and prone to
disaster.
So, although the Halo light upgrade is vastly superior
to the first version, it still isn't good enough for
me to recommend whole heartedly. If you've not upgraded
to SP, then the best internal light for your GBA is
still the AfterBurner.
|